Let’s go through the whole setup of Phoenix:
You can find Phoenix wallet here.
The following text is a chapter from my book The Orange Flash of Freedom: Understanding and using the Bitcoin Lightning network. I include it here for those of you that prefer to read in addition to seeing videos, but reading this text is not mandatory to understand the lessons of this course.
Start with a simple lightning wallet – Phoenix or Breez
I believe that the best way to learn is through experience. I used to say that I can explain Bitcoin either by doing a two hour talk, or just showing you in five minutes. If you follow along this, you will end up with a Bitcoin and Lightning wallet that works, is self-sovereign (you own the keys) and does not require identity verification.
Lightning wallets have historically had a reputation for being like rocket science. The user had to run their own node, open channels, and make complex configuration settings. The “solution” to this problem of complexity, which is still presented as the best by many bitcoiners as of today, is to use a “custodial” wallet – that is, to make Bitcoin not an self-sovereign electronic cash system, but turn it into a bank account with QR codes. Fortunately, this whole looking at Lightning is outdated – the Breez and Phoenix wallets show that it is possible to have a wallet that keeps the sovereignty of the users over their assets (i.e., private keys), but automatically and reasonably well handles all the other tricky stuff – node, network connectivity, routing, channel creation, and even switching between on-chain and lightning.
I know that I did not explain these concepts in detail yet, but that’s the beauty of these wallets – in order to use them, you do not have to understand anything yet. But don’t worry, we’ll explain it later.
User view
Both wallets can be used right away with a few clicks after installation. You can accept your first Bitcoins either via Lightning or using on-chain payments. Both wallets will create a Lightning channel when you make your first payment. Unlike many other wallets (Zeus, Mutiny, Aqua, Blixt, Green) you have one balance – all your Bitcoins are in a Lightning payment channel. From the user’s perspective this is very convenient, they don’t have to move Bitcoins between two payment networks.
Where these wallets differ is the overall concept. Breez is a laboratory of Lightning technology and is built as a “super-app”, like China’s WeChat. In Breez, you can listen to podcasts (and stream sats to your favorite podcasters thanks to podcasting 2.0 technology). It has a few other apps integrated that are available directly from the Apps menu, where you can directly access services like Bitrefill, Wavlake, Boltz, Azteco or The Bitcoin Company. Breez also works as a point-of-sale terminal to accept payments on the fly.
In contrast, the Phoenix app is extremely simple – it does one thing and does it well. It can receive and send Bitcoin payments – whether on-chain or via Lightning. In fact, there are a few interesting other features under the hood, but the effort is clearly to create a minimalist Lightning wallet that just works.
Phoenix installation and setup
First, let’s look at the Phoenix wallet setup. Once installed from the stores (Play or App Store, depending on the platform), we are greeted by a splash screen. We can then choose whether we want to create a new wallet or restore a backup:

Image: initial selection – do you want to create a wallet or restore another Phoenix wallet from seed?
If we click to create a new wallet, we can start using it immediately:
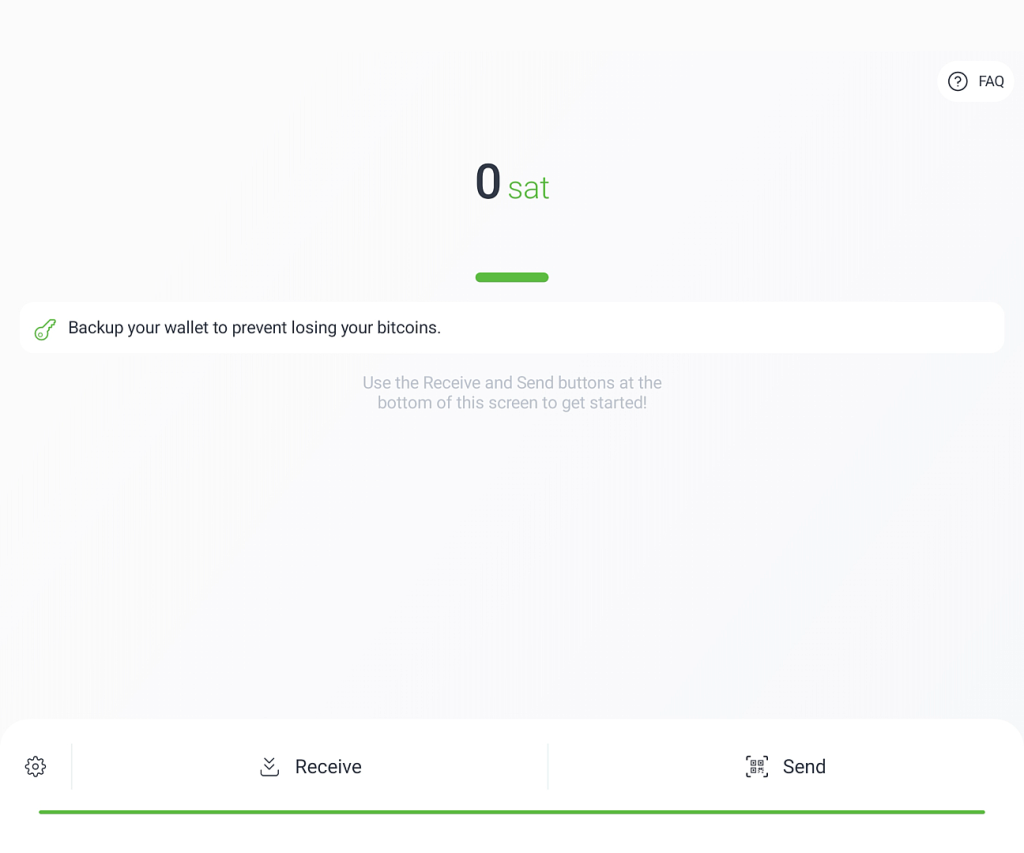
The whole wallet is about two buttons – Receive and Send. Note that the wallet notifies us that we haven’t backed it up yet, we should not forget to do that (I’ll show you how later).
That was easy, wasn’t it? It’s even easier than custodial wallets – no need to fill in any email addresses or phone numbers. Now let’s accept the first payment. Let’s click on the Receive button.
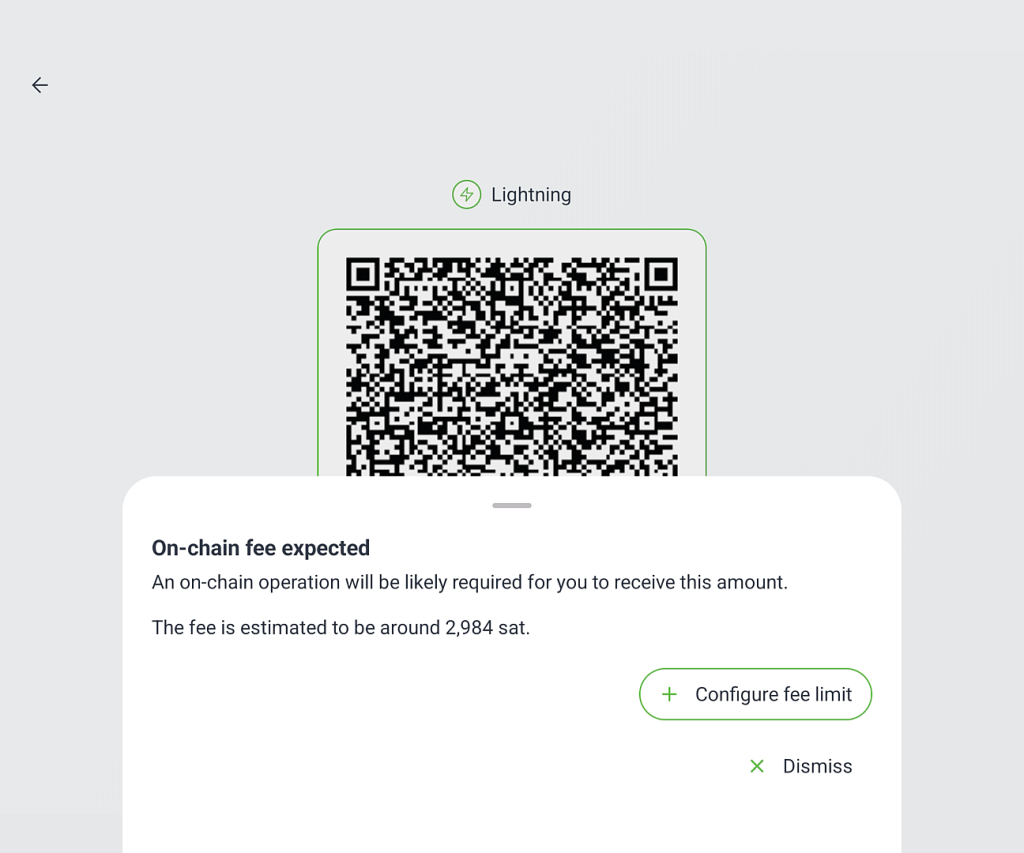
After clicking on Receive, a QR code will pop up, but before that you will see information that the first payment will include a fee. In this case, the fee is 2984 sats. If the fees are higher than usual, we will need to change the settings and increase the maximum fees we are willing to pay by clicking on Configure fee limit. These fees are largely based on how many transactions are waiting to be confirmed on the bitcoin network and we will talk about how fees work later in the book.
After dismissing the fee screen, we can click on the Edit button and write a description of the incoming payment (this description will also be seen by the sender and will remain in your wallet as a description of the payment) and the amount you want from the other party. You can enter the amount in sats, but also in your chosen fiat currency (you can choose this in the settings).
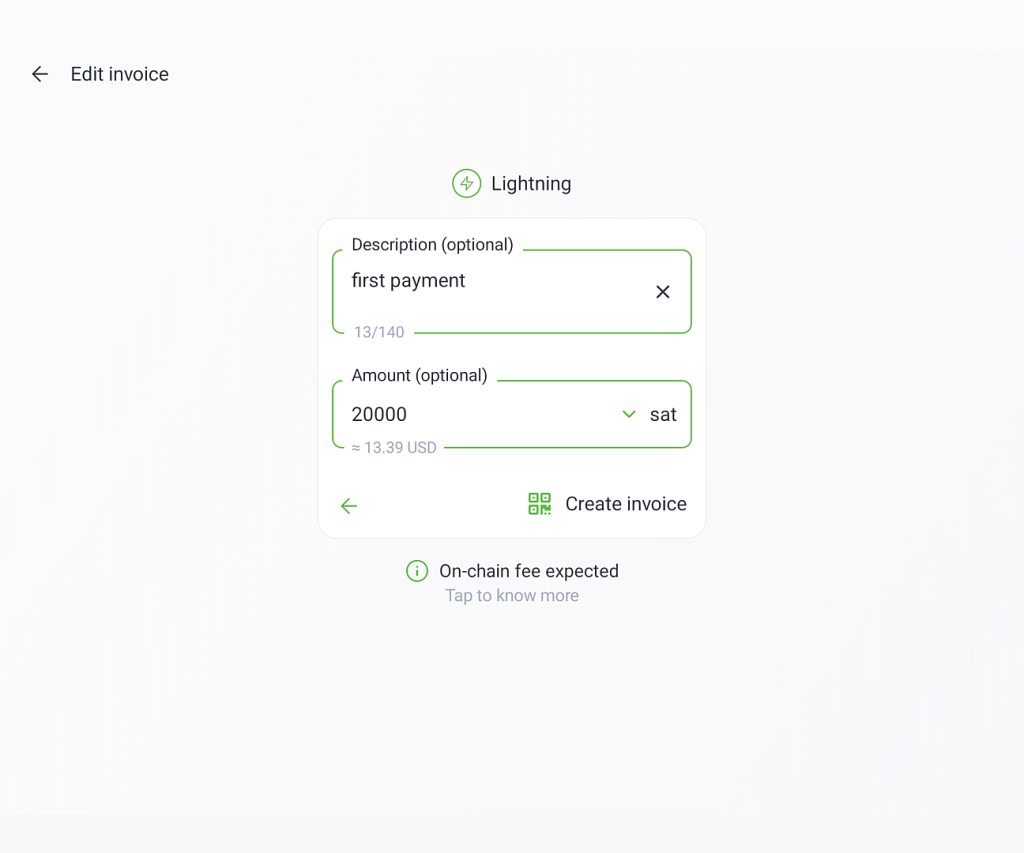
After entering a description and amount, you can click on Create Invoice. The application still warns us that we need to make an on-chain transaction (in this case, opening a channel) to receive this amount and thus we should expect a fee.
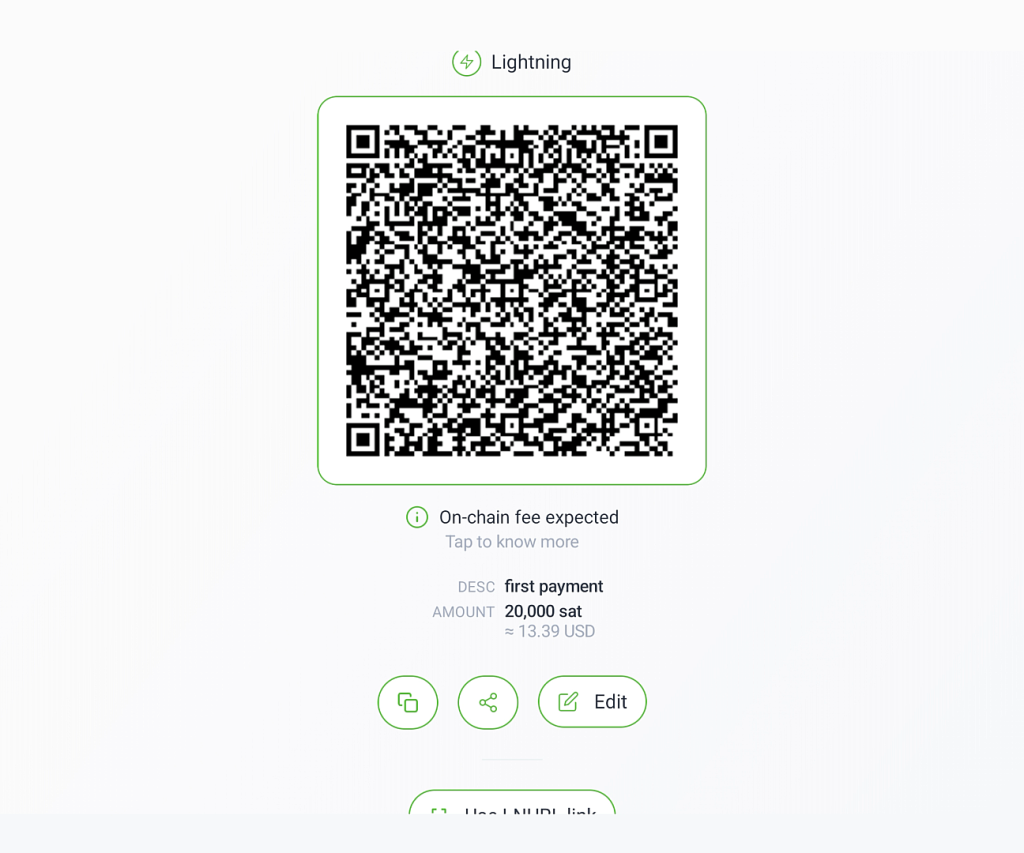
When you click on Create Invoice, the app will display the QR code of the Lightning Invoice. However, we can also share the invoice (by clicking the share button) or copy it to the clipboard.
If we pay this invoice from another wallet, we will get a confirmation screen:
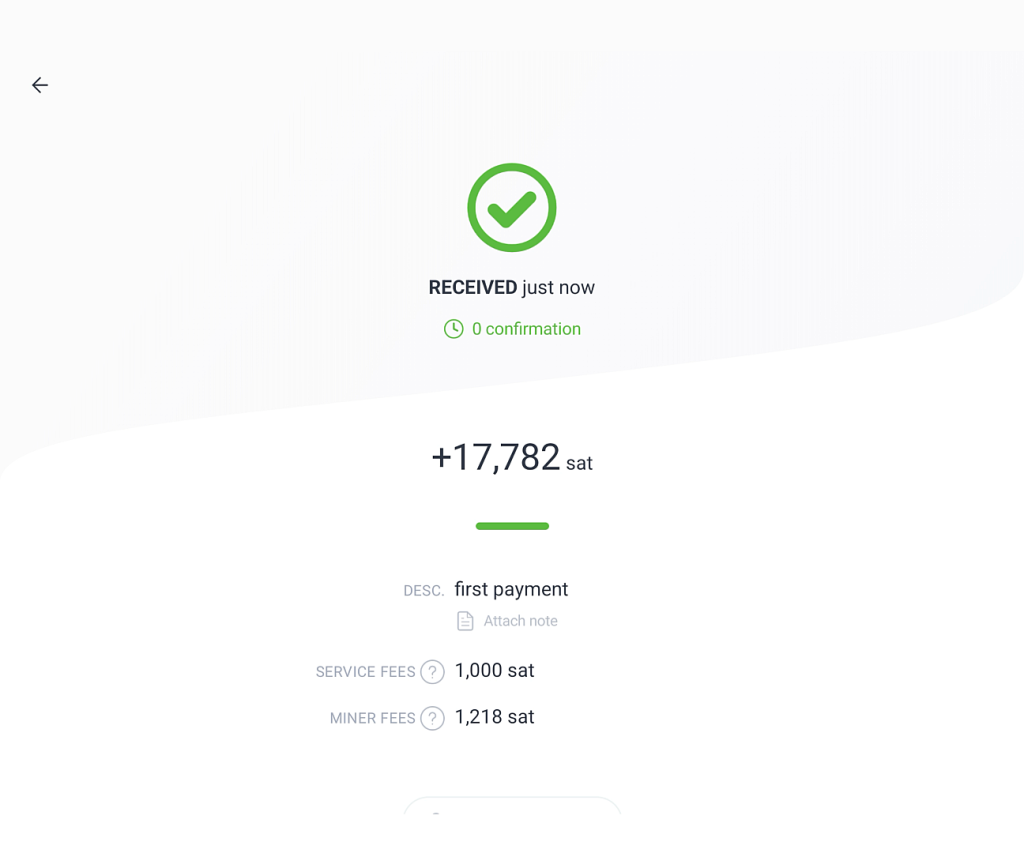
Received payment will show how much we have received in the wallet and what is the fee breakdown – we have paid 1218 sats to the miners and 1000 sats as a service fee for first opening of the channel.
The received payment has no confirmations on the network, the channel funding transaction has to be included in the block (mined) by the miner. However, since the payment came via Lightning the balance is immediately usable and we don’t have to wait for the miners at all.
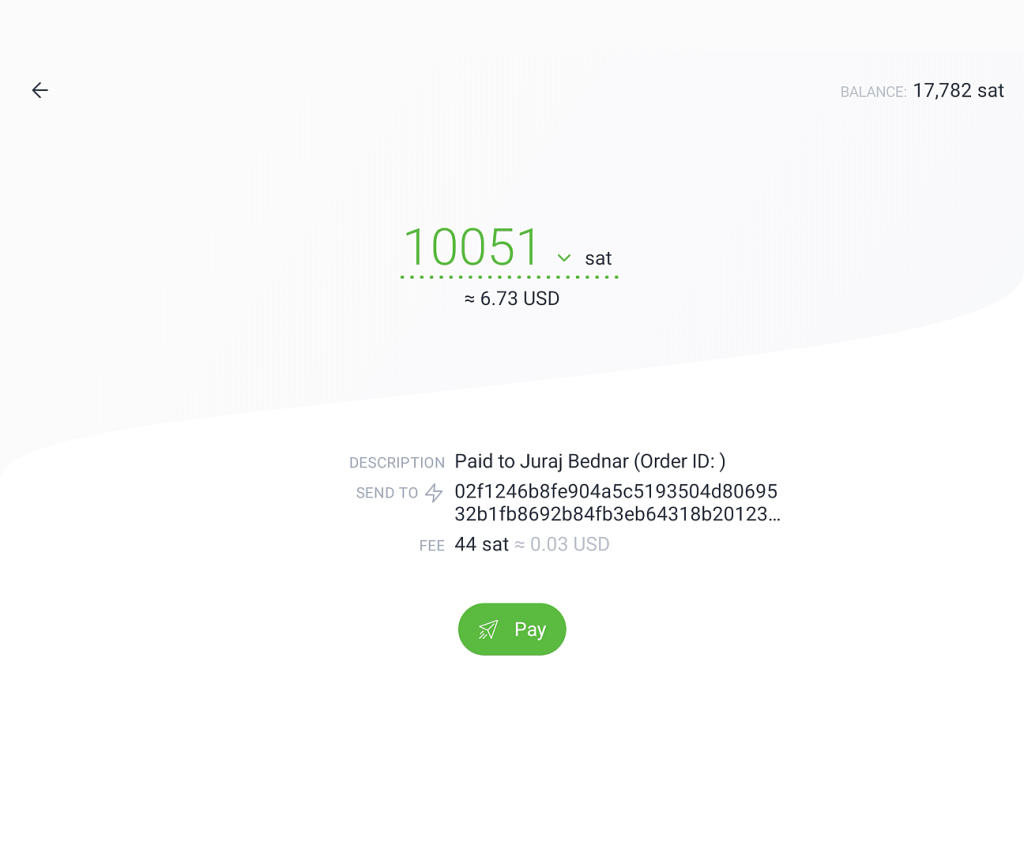
Sending works in a similar way – click on the Send button. After enabling access to the camera (so we can scan QR codes), we can either scan the QR code from the display of recipient wallet, or insert a payment request from the clipboard. I scan the QR code from my BTCPayServer:
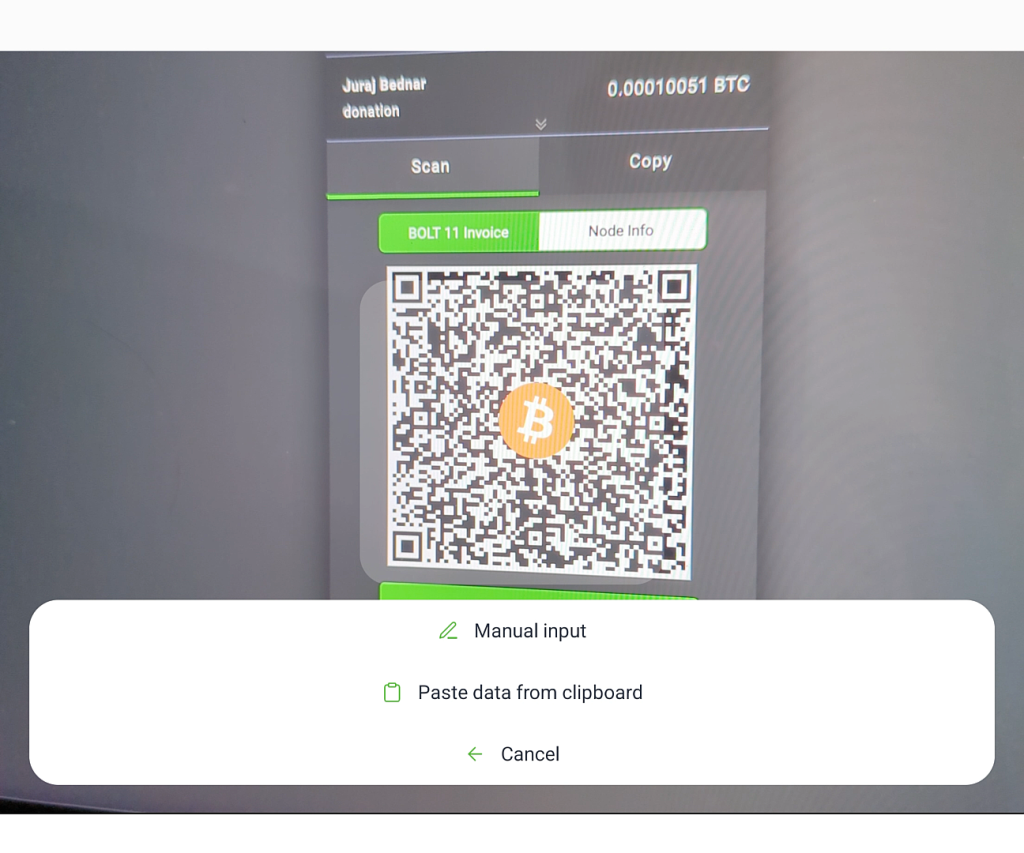
However we give the wallet the payment request (lightning invoice), the next screen will give us the details – payment description, amount, fees and so on.
We can look at the main screen where we can see an overview of all payments and access other settings, including the ability to request liquidity.
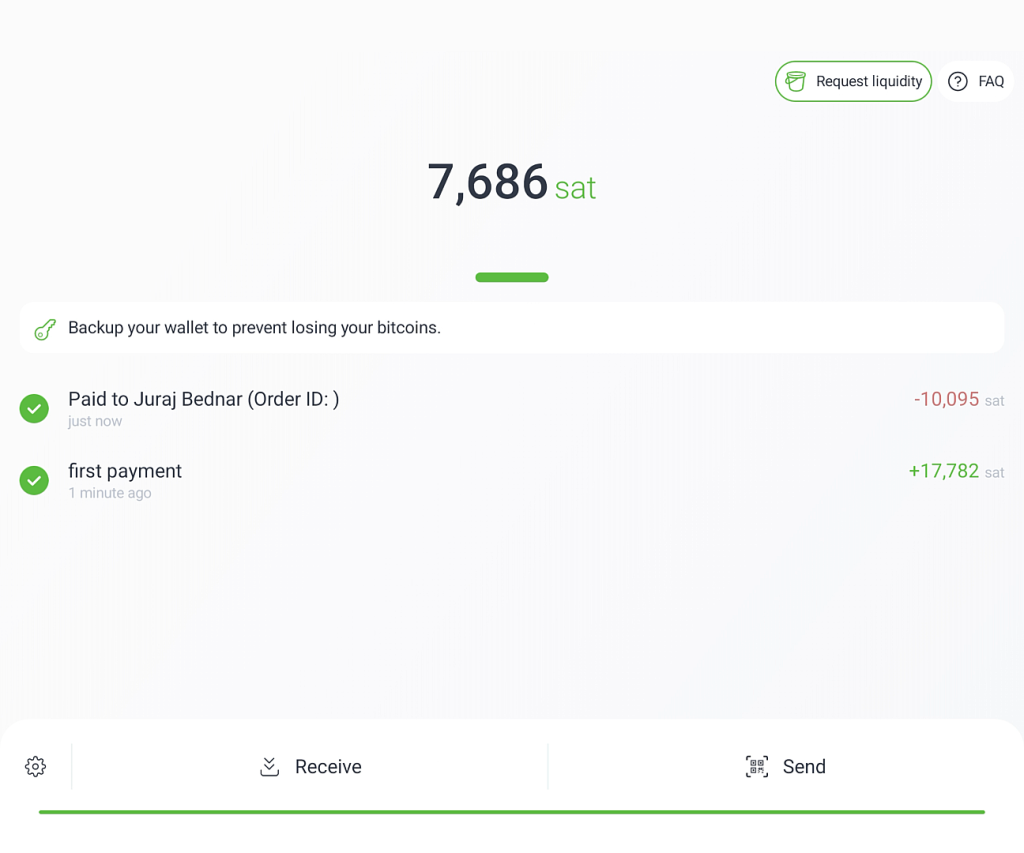
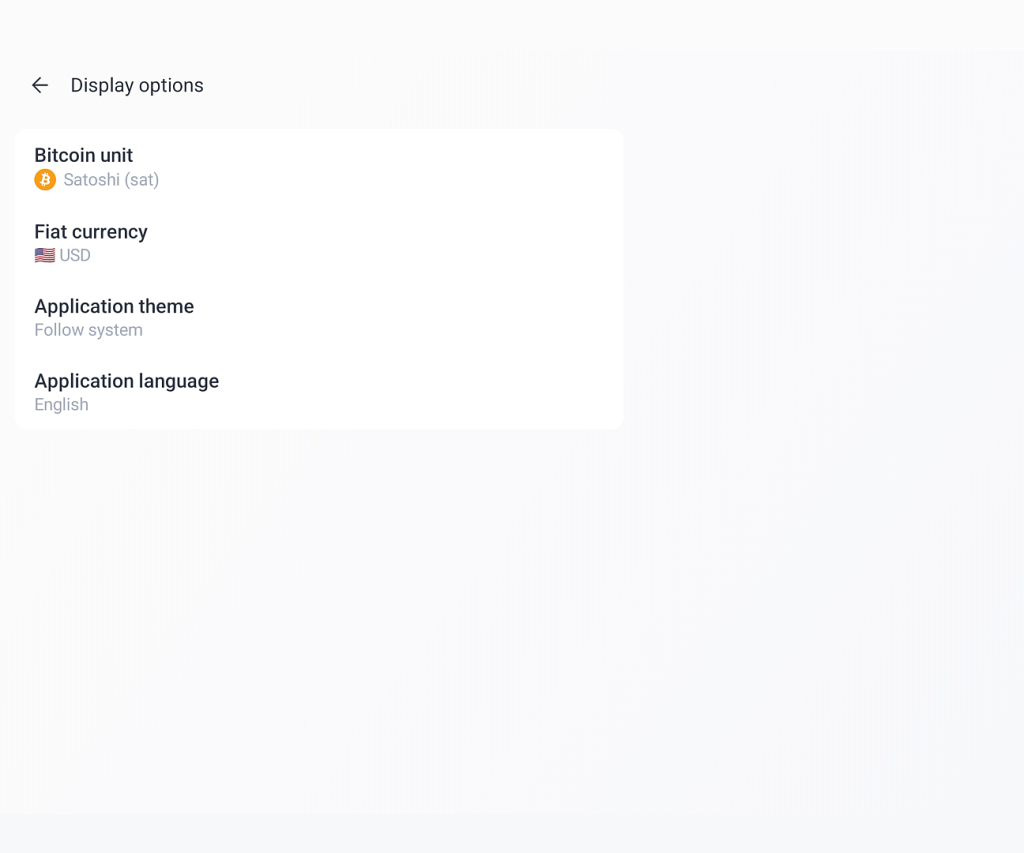
By clicking on “sat” after the balance (7,686 sat) on top, we can change the currency in which the amounts are displayed – for example, to Euros, Dollars, Czech Crowns, Paraguayan Guarani or any other fiat currency. With another click, we can also hide the balances so that we don’t show the wallet balance when we interact with other people.
On the screen, I hope we all noticed that we still haven’t backed up our wallet. Let’s fix that – clicking on the warning will take us directly to the backup screen. If we’d like to backup again later, pressing the gear button on the bottom left will take us to the settings menu and we can select “Recovery Phrase”.
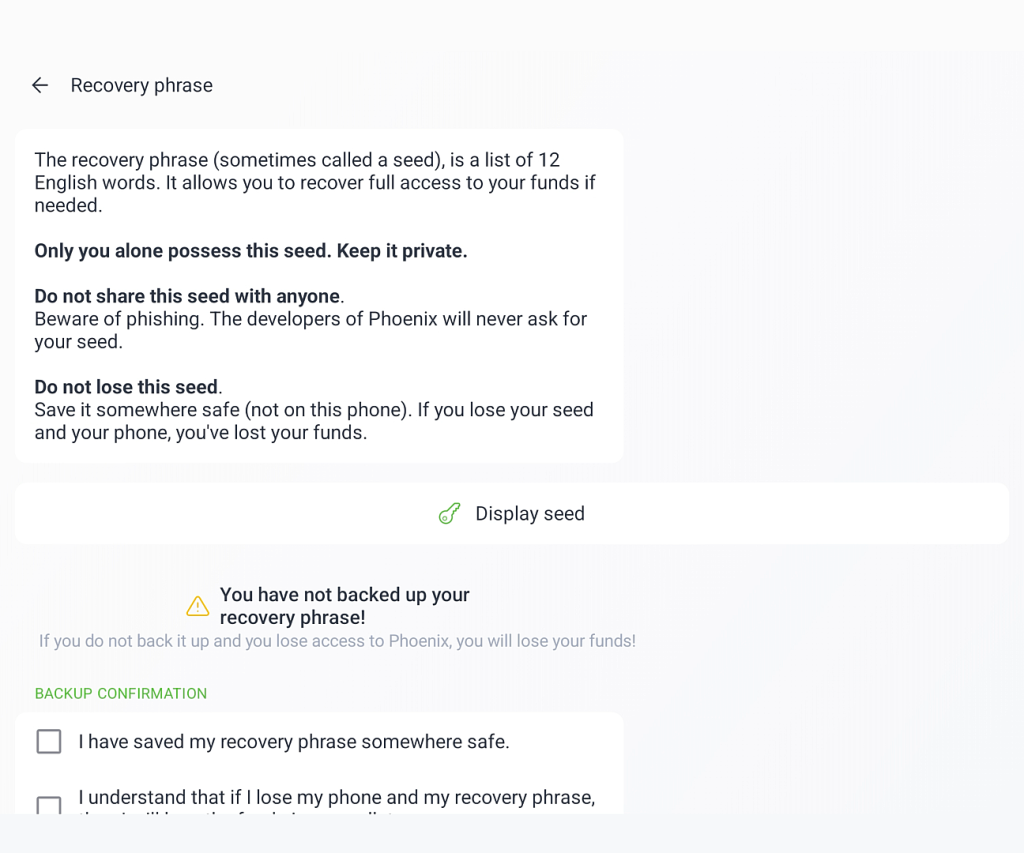
The backup page is self-explanatory, I recommend reading it carefully. Clicking on “Display seed” will show us 12 words to write down.
After writing down the 12 English words that make up the wallet’s backup, we confirm that we have written them down in a safe place and that we understand that if we lose both our phone and our backup, we will never get our Bitcoins back.
Please, really make a proper paper backup and store it somewhere safe. Please don’t just take a screenshot stored randomly in your photos library. And by the way, the wallet won’t allow you to do a screenshot anyway, although many people “solve” this by taking a picture of their phone with the camera on their other phone. A lot of people lost money because they wanted to make a backup “sometime later”. It’s 12 words, you write it down in less than three minutes.
To accept on-chain Bitcoin, swipe left in the Receive tab – this will display the Bitcoin address and its corresponding QR code. Simply send Bitcoins to this address and they will appear in your wallet. You don’t need to do anything special to send an on-chain payment – if you scan the on-chain address or payment request (or paste it from the clipboard), the payment will normally work as if you were using a normal Bitcoin on-chain wallet.
Let’s look at a few more interesting settings. Click on the gear wheel to display the menu:
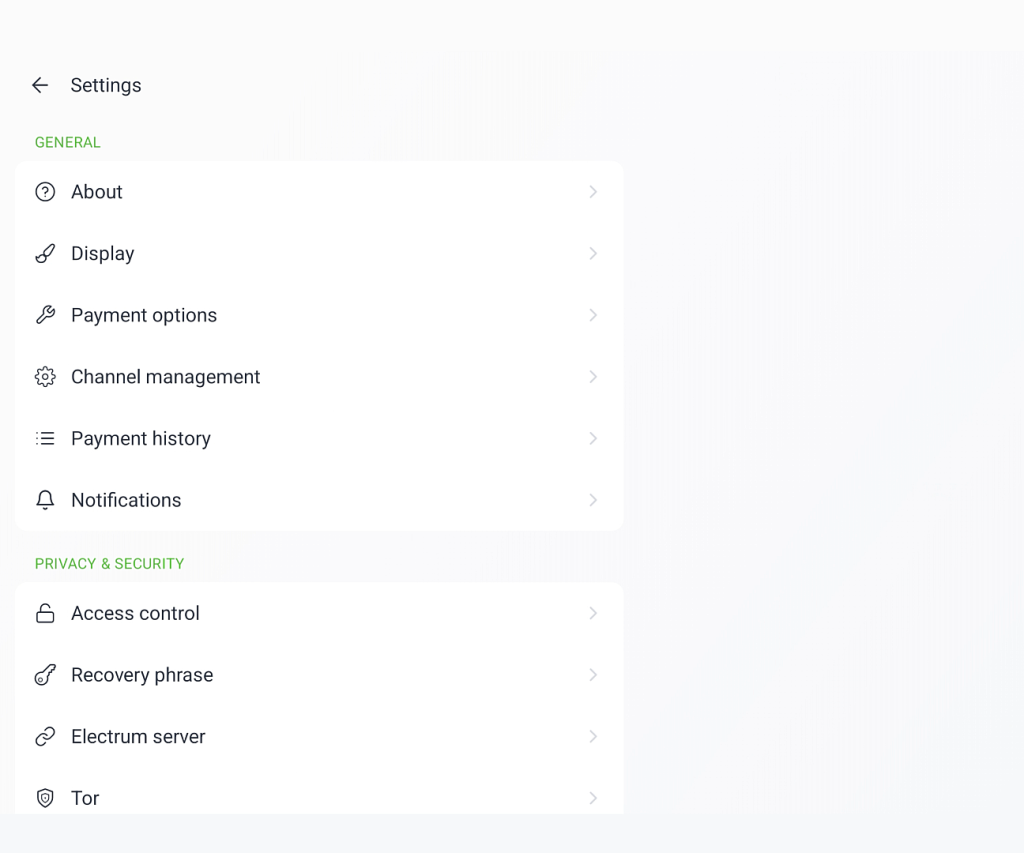
If you are into privacy, you can turn on the Tor anonymization network. Phoenix (unlike Breez) has Tor support directly integrated in the wallet and all we need to do to use it is to turn it on in the menu. It’s good to say here that using Phoenix with Tor is significantly slower, all payments may not go through automatically, and the app occasionally needs to be restarted to connect to a different Tor entry point. Personally, I use Phoenix without Tor.
In the Display section we have the option to change the fiat currency, language and display settings.
If we know that we will be using the wallet more for receiving payments than spending, we may want to request liquidity. We do this by clicking the “Request Liquidity” button on the main screen.
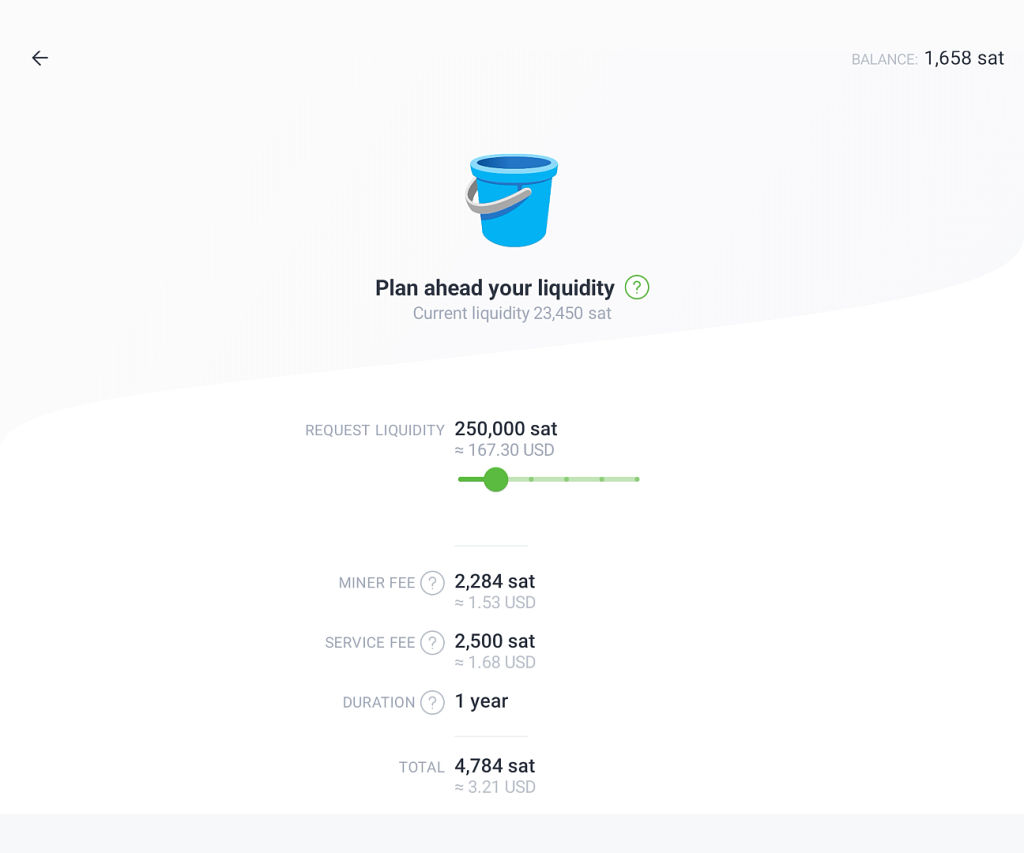
If you want to increase incoming liquidity, it is a good idea to do that when on-chain fees are low (usually weekends), so that we don’t pay too much to the miners. At the same time, higher liquidity is often cheaper in percentage fees – while the payment to Phoenix Wallet liquidity provider depends on the amount (1% at the time of writing), the miner fee is fixed, so you can get more liquidity for the same fixed miner fee and don’t have to extend it later.